How To Fix Squeaky Stairs

While squeaky, creaking, groaning stares might be an excellent sound effect in horror movies, they’re not desirable in the home. After all, it only takes one noise to tell the tale of a person’s clandestine comings and goings, whether it’s sneaking downstairs to watch some illicit late-night TV, or coming back up to bed after a delicious, off-diet midnight snack. Beyond the tattle-tale potential, though, squeaky stairs can be just plain irritating. We’re going to look at the factors that cause wooden stairs to squeak, and go over what you can do to ensure a long, happy life with your staircase.
Getting To Know Your Stairs
It seems simple, right? Stairs are stairs. Well, yes, but stairs are stairs
in the same way people are people: composed of parts coming together to form
a singular object. This diagram from Rebekah Zaveloff KitchenLabs Designs
shows a closer look at these parts:
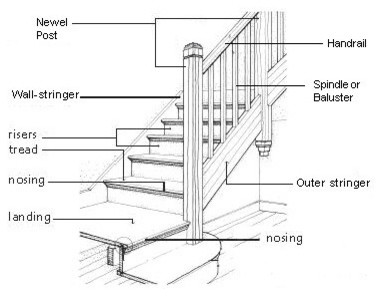
The Nosing is the part of the tread that protrudes past the riser. Frequently it’s textured for additional grip and safety.
The Tread is the flat surface on top of the riser that gets walked on. These can be made of any flooring material, although some are more advisable than others. These are also frequently textured for safety.

An example of textured treads.
The Riser provides the elevation. Painted or decorated risers are a great way to add flair to a design scheme.
The Landing acts as a quick resting place, and can also change the direction of a floor by 90 degrees.
The
Wall Stringer is used to secure stairs to the wall.
They’re saw-tooth pieces of wood that support both the tread and the riser
from underneath. Some staircases may have both an inner and an outer wall
stringer, but each floor will have at least two, one inner wall stringer and
one center stringer. Like risers, wall stringers can also make great accent
pieces with some paint and some imagination.
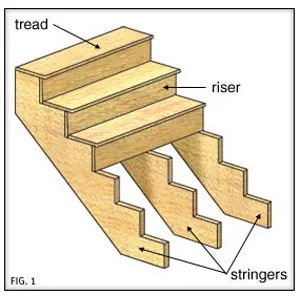
Stringers, Risers, and Treads. Diagram from This Old House.
The Hand Railing provides support and something to grasp onto.
The Spindles or Balusters help anchor the hand railing and help prevent things (people, pets, miscellaneous accouterments) from falling.
The Newel Post holds up the hand railing. Newel post designs range from the basic to the very elaborate, as shown below:

Gorgeous carved horse newel. Found on Pinterest.
What Causes Stairs To Squeak?
As mentioned in a previous post about the importance of acclimating your flooring, wood naturally expands and contracts due to temperature and humidity. Expansion and contraction cause the wood’s initial measurements to change, and wood joints tend to loosen with age. This causes the treads to rub up against the risers and the stringers, and then all of these parts chafe against the nails holding it all together, hence all the squeaking.
How To Stop The Racket
First, find out exactly where the squeaking is coming from, and yes, that means testing each individual step. Sometimes the joints between a stair’s moving parts just need a little tender loving care, and that can be fixed with a spritz or two of talcum powder or graphite powder (available at hardware stores) from a spray bottle. This is a quick, easy way to lubricate the joints and quiet the squeaking.
If that doesn’t work, it’s time to look for an alternate solution. According to This Old House, “most likely, either the tread is knocking or rubbing against the riser board, the tread has come loose from one or more of its stringers, or both.” There are multiple ways to fix this. If you’ve got access to the underside of your staircase, you can fix the problem by attaching wood blocks or brackets to the problem steps. This is an invisible fix; the only difference will be the peace and quiet in your home!
Bowed stair treads can be fixed by attaching a block to the back side of the
riser, which will help push the tread up, help keep the parts properly
aligned, and eliminate the odious squeaking. Metal angle brackets are
another option when you have access to the underside of your staircase, as
shown below:

Metal Angle Brackets
Angle brackets go in the angle between the riser and the tread, and can be fastened into place with decking screws. Once side is affixed to the back of the riser, while the other side is affixed through the tread.
If you don’t have access to the underside of your stairs, don’t worry! There are still fixes available. In some instances, the squeaking can be stopped by reattaching the tread to the riser. This is a good option if your stair squeaks when you step on the front of the tread. If the stair squeaks at the side or at the back towards the riser, things get slightly more complicated, since the fix might involve the stringers.
This is where caution and a good assistant come in handy. If you can’t see your stringers, don’t just start hammering and screwing into approximate locations. Look for the existing fasteners first, and let them guide you. For instance, This Old House recommends having your helper stand on the stair with one foot on either side of the stringer, compressing them together. You would then drill two starter holes into the tread at opposite 45-degree angles.
What’s the key word there? Starter holes. Don’t drill too all the way through, instead save that for your nails. You also want to avoid nailing straight down. Aim for a 45 degree angle.
If your stairs are carpeted, you’ll need to remove the carpeting prior to making any repairs. While this might seem like a hassle, just remember the carpet will cover any evidence of repairs!
Follow Team Floors To Your Home on Facebook
